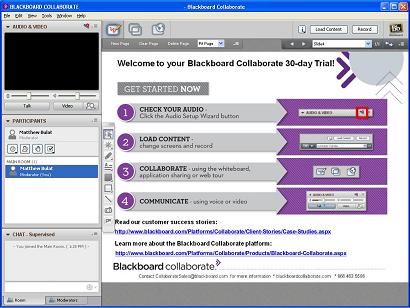
Elluminate and Wimba have merged and created Blackboard Collaborate. This has been chosen by ACS (QLD) for video conferencing.

It allows:
multiple site video
PC screen sharing
VOIP audio
Whiteboard sharing
text chat
recording
and up to 100 remote users.
Large Image of Blackboard Collaborate User Interface
Remote User Requirements
- Internet connection
- PC or Mac or Linux computer
- Internet Browser - Internet Explorer, Firefox, Safari
- Java Enabled
- Hyperlink for desired conference as participant

Presenter Site Requirements
- Internet connection
- PC or Mac or Linux computer
- Internet Browser - Internet Explorer, Firefox, Safari
- Java Enabled
- Hyperlink for video conference as moderator from Blackboard
- Webcam
- Microphone/s
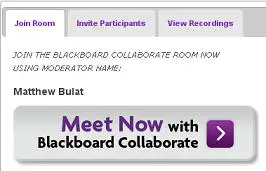
The Blackboard Collaborate Moderator user interface has 3 tabs. Join room Meet Now button will start a video conference. Invite participants has a hyperlink for joining a video conference. View Recordings has a list of hyperlinks for previous recorded video conferences. The links can be used to see the video conference at any time.
Start a new video conference for the moderator or presenter
- Start this process 10 minutes or more before the start of the video conference.
- From an approved browser, click moderator hyperlink provided by Blackboard.
- Click Meet Now button
- Click OK to open file Meeting.jnlp
- Java will start automatically
- Click Run to start Blackboard Collaborate.
- Wait for 1-2 minutes for Blackboard Collaborate to open
- Test webcam using Tools - Video - Camera Settings menu
- Test microphone using Tools - Audio - Audio Setup Wizard
- Load any presentations by clicking Load Content button. This can take a few minutes to upload.
- Click Talk button to turn on microphone
- Click Video button to turn on webcam
- Presentations controls are across the top of the screen
- Record button can save the video conference for later. Recording can be paused and resumed.
Remote User Access
- Allow 5 to 10 minutes ahead of conference time to set up your connection
- Click on video conference hyperlink provided by presenter.
- Enter Full Name and click Meet Now button
- Allow a small meeting file to download (~ 5kB)
- Run downloaded file
- Wait for Blackboard Collaborate to to load up
- Click Accept button to connect to the video conference
- Select your connection speed class e.g. DSL and click OK
- There are 3 sections - Controls, Video Feeds and PC shared screen
Controls and Video feeds are on the left. PC shared screen windows are on the centre and right. Windows can be resized and moved.
Remote User Controls
- The simplest connection is to watch and chat.
- Participants are listed at the left
- Voting, raise hand, emotions cue buttons appear above the participants list.
- Buttons can be used to vote on a topic or repond that you understand etc.
- Chat section has a main section showing the whole conversation.
- You can add text or questions or comments as required in the lower left textbox. Press Enter when finished.
Audio Conferencing
A headset with microphone is the best connection method. This can be wireless.
A Audio Set Up Wizard is available under Tools - Audio - Audio Setup Wizard to test the mic.
When you want to speak click on the Talk button to turn on.
When finished speaking turn the Talk button off (greyed).
Note, there will be a slight delay in audio transmission.
This method results in the clearest audio conference.
Presentation Sharing
- Click Load Content Button
- Select presentation to upload PowerPoint, KeyNote, Impress files OK
- Allow time to upload presentation.
- Participants cannot see the Page Explorer window. Select Hide Page Explorer to minimize along top of screen.
- Allow 1-2 seconds for a new slide to be seen by all participants.
Application Screen Sharing
- Load the application you want to share. Resize the Window size to 75% of screen.
- Click 2nd icon across top for Application Sharing (2 rectangles)
- Select from list the application you want to share viewing
- Application will appear in main window
- Resize application window to fit Blackboard Collaborate main window
- Widescreen computers are useful to allow the application and left column controls to share space.
Whiteboard Sharing
- Click New Page to have a empty white page appear.
- Drawing controls are on the left of the white page
- Multiple people can contribute on the same whiteboard
- The white page works like a new blank slide. Use Presentation sharing controls to go back to presentation.
Video Conference Single User
A computer with a webcam is required.
There is a maximum of 6 concurrent video feed sources possible.
Lighting from behind the camera towards the user is desired.
Click Video button to activate your webcam.
Your video feed will add to the Video and Audio Window.
Click Video button again to turn off your video feed (greyed).
The quality of your video feed is proportional to your connection speed and lighting.
An ADSL 1 connection will generate about 4 small frames per second
A headset with microphone is still preferred with this connection.
Video Conference Room
A computer with speakers, High Definition webcam, webcam tripod and advanced microphone/s is required.
There is a maximum of 6 concurrent video feed sources possible.
Lighting from behind or above the camera towards the users is desired.
From below the Video and Audio window click Video button to activate your webcam.
Your video feed will add to the Video and Audio window.
Click Video button again to turn off your video feed.
One PC screen can be shared if Application Sharing is clicked on the top menu.
The quality of your video feed is proportional to your connection speed and lighting.
Advanced Microphone Techniques for a room
- Keep microphone/s away from loudspeakers
- Keep multiple microphones apart
- Microphone need to point towards talking participants.
- Powered table top microphone can suit a small group.
- Multiple wireless microphones can be used for a dynamic group.
- A multiple wireless microphone receiver can have a mix output that goes to a computer.
- Blackboard Collaborate does some automatic microphone level adjustment.
- The quality of the presentation to the remote audience is dependant on good microphone techniques.
- If you are a remote participant who cannot hear, send a chat text.
Video Conferencing Tips
- Support tools are available from Blackboard Collaborate support
- Test your computer sound before the start of the video conference.
- A Moderator that is watching the Chat session can direct appropriate questions to the presenters.
- A moderator is useful to control which participants have what access levels.
- Remember to watch your microphone technique. Too many open microphones will create noise.
- Blackboard Collaborate has a free trial download for up to 25 user video conferencing for 1 month including recording. Useful for practice.Blackboard Collaborate trial
- Good upload speed (e.g. NBN) from video sites creates a better experience.
Use the NBN to your advantage.


